A radiant barrier is a reflective foil that reduces the amount of radiant heat transferring from your hot roof deck into the attic space below. FSEC research in Florida homes shows properly installed radiant barriers reduce cooling costs by 8-12%. They cost $500-1,500 installed or $0.15-0.30/sq ft when added during a reroof — but they do not add R-value, they do not replace insulation, and they stop working if they get dusty or damaged.
After reading this page, you'll understand what radiant barriers actually do (and don't do), how the three main types compare, how to check whether yours is functioning, and whether adding one makes sense for your home.
The Decision Summary
Radiant barriers are a real, measurable improvement — but they are not the most impactful improvement for every home. If your insulation is below R-30, adding insulation delivers more savings per dollar than a radiant barrier. If your ductwork leaks in a hot attic, sealing ducts delivers more comfort per dollar. A radiant barrier works best as a complementary layer on top of adequate insulation and sealed ducts.
The best time to install one is during a reroof. Foil-faced roof sheathing costs only more than standard sheathing when the roof deck is already being replaced. No additional labor required — the installer uses foil-faced OSB instead of standard OSB. This is the single cheapest way to add a radiant barrier.
Retrofit installation is cost-effective but not transformative. A standalone radiant barrier installation runs for professional work. At 8-12% cooling cost reduction, the payback period is typically 3-7 years on the Gulf Coast, where summer cooling bills run $150-300+/month.
How Radiant Barriers Work
Heat moves from your roof to your living space through three mechanisms: radiation, conduction, and convection. On a 95°F Gulf Coast summer day, your roof deck reaches 140-160°F. That hot surface radiates infrared energy downward into the attic — the same way a hot stove radiates heat you can feel without touching it. This radiant heat accounts for roughly 40-50% of total attic heat gain.
A radiant barrier reflects 95-97% of that infrared radiation back toward the roof. Standard aluminum foil with an emittance of 0.03-0.05 lets almost no radiant energy pass through. The heat bounces off the reflective surface instead of being absorbed by the attic floor insulation and eventually conducted into your living space.
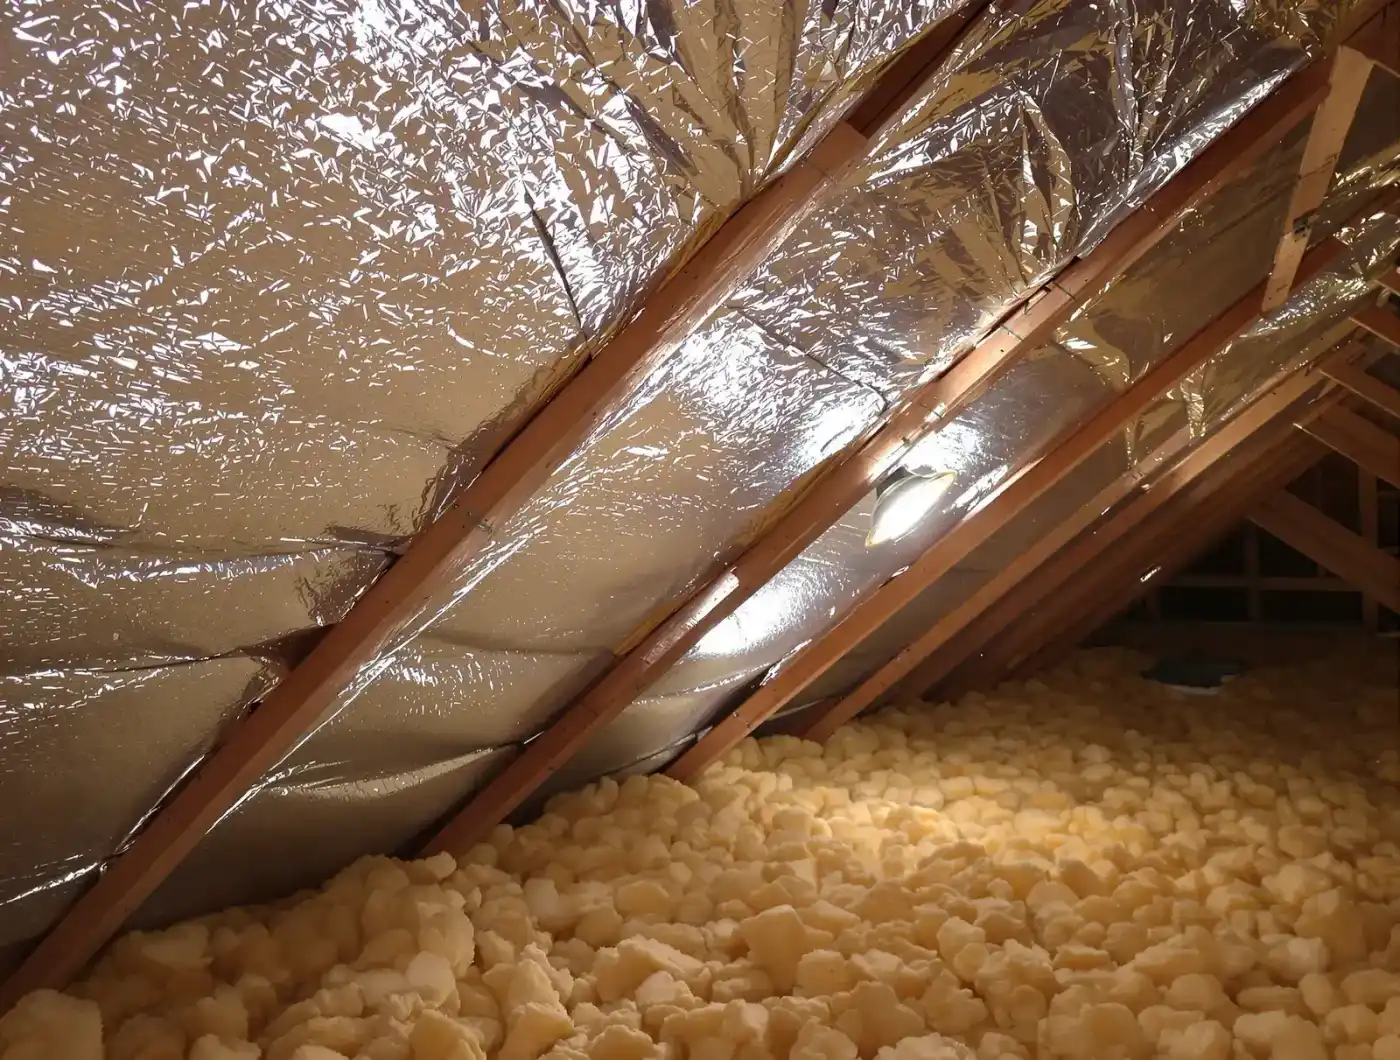
The barrier must face an air gap to work. If foil touches insulation or another surface directly, it conducts heat through contact instead of reflecting it. This is the most common installation error and the reason you never lay foil flat on top of insulation. The air gap — even 3/4 inch — is what allows the reflective surface to do its job.
Radiant barriers do not stop conductive or convective heat transfer. Heat still conducts through the insulation below. Hot air still rises and circulates in the attic. The barrier addresses only the radiant component — which is significant (40-50% of attic heat gain) but not the entire picture. This is why insulation and ventilation still matter even with a radiant barrier installed.
Radiation is electromagnetic energy emitted by any warm surface. Your 150°F roof deck radiates strongly in the infrared spectrum. This energy travels at the speed of light and heats any surface it hits — insulation, ductwork, framing. A radiant barrier intercepts this energy before it reaches those surfaces.
Conduction is heat moving through solid materials by molecular contact. Heat conducts through the roof sheathing, through framing members, and through insulation (slowly if the insulation R-value is adequate). A radiant barrier does not change conduction rates — only insulation R-value does that.
Convection is heat carried by air movement. Hot air rises to the ridge, cool air enters at the soffits. Attic ventilation removes convective heat. A radiant barrier does not significantly affect convective heat transfer.
The percentage split between these three mechanisms depends on attic construction. In a typical vented attic with R-30 insulation, radiation accounts for 40-50%, conduction 30-40%, and convection 15-20% of total heat gain into the living space. This is why a radiant barrier addressing only radiation produces 8-12% total cooling savings, not 40-50% — because cooling cost is driven by all three mechanisms plus duct losses, air infiltration, and solar gain through windows.
Common misconception:
Radiant barriers add R-value to the attic. Some manufacturers claim 'equivalent R-value' of R-10 or higher.
Gulf Coast reality:
Radiant barriers have zero R-value. They reduce radiant heat transfer, not conductive heat transfer. 'Equivalent R-value' claims are misleading because the benefit varies dramatically with temperature, emittance, and air gap conditions. A radiant barrier performs like no additional insulation in cold weather and like R-5 to R-10 worth of conductive benefit only under peak summer radiation conditions. FSEC researchers specifically caution against R-value equivalency claims.
Think about it...
Your neighbor tells you they stapled radiant barrier foil directly on top of their blown-in attic insulation. Is this an effective installation?
Three Types of Radiant Barriers
Foil-Faced Roof Sheathing
Foil-faced sheathing (LP TechShield, ZIP System R-Sheathing) is standard OSB with a factory-bonded aluminum layer on the attic side. It replaces standard roof sheathing during a reroof or new construction. The foil faces the attic space with a natural air gap between the sheathing and the insulation below. No additional installation labor required.
This is the most effective and lowest-cost radiant barrier option during a reroof. The foil stays clean because it faces downward (dust settles away from the reflective surface). The factory bond ensures consistent emittance across the entire surface. Cost premium of over standard sheathing makes this essentially a no-brainer addition during any reroof on the Gulf Coast.
Limitation: only practical during reroof or new construction. You cannot retrofit foil-faced sheathing without removing the existing roof. If you are not planning a reroof, draped foil or spray-on products are the retrofit options.
Draped Foil (Retrofit)
Draped foil is reflective sheeting stapled to the underside of the rafters, left to drape slightly between each rafter bay. It creates a reflective surface facing the attic space with an air gap between the foil and the roof deck above. This is the most common retrofit method and the standard DIY approach.
Materials cost and professional installation runs $500-1,500 for a full attic. The foil must be perforated (tiny holes that allow moisture vapor to pass through) in Gulf Coast climates. Non-perforated foil traps moisture between the barrier and the roof deck, creating condensation and mold risk — a serious problem in humid environments.
The draped installation preserves ventilation airflow along the underside of the roof deck. Unlike foil stapled tight to the sheathing (which blocks convective airflow), the drape creates a channel for air to move from soffit to ridge. This is important because blocking that airflow path can increase moisture problems and reduce the ventilation system's effectiveness.
Spray-On Radiant Barriers
Spray-on radiant barriers use tiny metallic flakes suspended in a liquid carrier, sprayed onto the underside of the roof deck. The dried coating creates a low-emittance surface. Application is faster than stapling foil, and it conforms to irregular surfaces around penetrations, hips, and valleys.
Performance data is mixed and less well-documented than foil products. Spray-on barriers typically achieve emittance of 0.15-0.25, compared to 0.03-0.05 for aluminum foil. That means spray-on products reflect less radiant heat. FSEC has not published equivalent field studies on spray-on products, so the 8-12% cooling savings claim has less research backing for spray applications.
Cost runs — more expensive than foil with potentially lower performance. Spray-on barriers may be worth considering for attics with difficult access or complex geometry where stapling foil is impractical. For standard attic configurations, foil products deliver more reflective benefit per dollar.
Think about it...
You're getting a reroof next month. What is the most cost-effective way to add a radiant barrier?
What the Research Shows: FSEC Data
The Florida Solar Energy Center (FSEC) conducted the most extensive field research on radiant barriers in hot climates. Their studies measured actual energy use in occupied Florida homes — with climate conditions nearly identical to south Mississippi, south Alabama, and the Florida Panhandle. Key findings:
- 8-12% reduction in cooling costs with properly installed radiant barriers over adequate insulation (R-19 or higher).
- Attic air temperature reduction of 10-15°F at peak conditions (comparing identical homes with and without barriers).
- Radiant heat reaching insulation reduced by 40-45% with foil emittance of 0.05 or lower.
- Duct surface temperatures reduced by 15-20°F in attics with radiant barriers — significant for homes with ductwork in the attic.
- Diminishing returns above R-30 insulation. Homes with R-38 or higher insulation see smaller percentage savings from adding a radiant barrier because the insulation already blocks most conductive heat transfer. The radiant barrier still reduces duct temperatures, which matters if ducts are in the attic.
The biggest benefit goes to homes with ductwork in the attic. A 15-20°F reduction in duct surface temperature reduces the heat gain into cooled air traveling through those ducts. In a home with R-6 flex duct running through a 150°F attic, the supply air can gain 10-15°F before reaching the register. A radiant barrier reducing the surrounding air to 130-135°F cuts that duct temperature rise by roughly 30%.
Before/After Comparison Panels
Interactive comparison showing attic temperature and energy impact with and without a radiant barrier, adjustable by insulation level and duct location.
How to Check If Your Radiant Barrier Works
Go into the attic on a sunny afternoon (after 2 PM) with an infrared thermometer. A infrared thermometer is all you need. Measure these three points and write down the readings:
- Roof deck underside (point the thermometer at the sheathing between rafters). On a 95°F day, expect 140-160°F without a barrier.
- Radiant barrier surface (the foil itself, attic-facing side). Should read 15-30°F cooler than the roof deck if working properly.
- Attic floor insulation surface (point straight down at the insulation). Should read 100-120°F with a working barrier, 120-140°F without one.
What the numbers tell you: If the barrier surface is within 5°F of the roof deck temperature, the barrier is likely dust-covered, damaged, or not installed with an adequate air gap. If the insulation surface is 20-30°F cooler than the roof deck, the barrier is functioning. If the insulation surface is nearly the same as the roof deck, something is wrong — either no effective barrier or the insulation itself is severely inadequate.
Visual inspection matters too. Look at the reflective surface. Can you see yourself in it (shiny and reflective) or is it dull and gray (dust-covered)? Foil-faced sheathing facing down stays clean for decades. Draped foil facing down also stays relatively clean. Any horizontal reflective surface collects dust and loses effectiveness within 6-12 months. Check for tears, sagging that contacts insulation, and moisture stains that indicate condensation problems.
For a complete step-by-step inspection, see How to Check If You Have a Radiant Barrier (and If It's Working).
Common misconception:
More ventilation plus a radiant barrier always means a cooler attic. The two improvements compound.
Gulf Coast reality:
In hot-humid Gulf Coast climates, excess ventilation can pull moisture-laden outdoor air into the attic, creating condensation on cool AC ducts and potentially promoting mold growth. A radiant barrier reduces radiant heat load regardless of ventilation rate. Adding ventilation beyond code-minimum levels in a humid climate does not always help — and in some cases makes moisture problems worse. Balanced ventilation at code minimum plus a radiant barrier is more effective than excessive ventilation alone.
Cost and Payback Analysis
| Installation Method | Material Cost | Installed Cost | Emittance | Typical Payback |
|---|---|---|---|---|
| Foil-faced sheathing (during reroof) | $0.15-0.30/sq ft | $300-600 total | 0.03-0.05 | 1-3 years |
| Draped foil (DIY retrofit) | $0.10-0.20/sq ft | $200-400 materials | 0.03-0.05 | 1-3 years |
| Draped foil (professional retrofit) | $0.10-0.20/sq ft | $500-1,500 total | 0.03-0.05 | 3-7 years |
| Spray-on barrier | N/A (labor + material) | $0.50-1.00/sq ft | 0.15-0.25 | 5-10 years |
Payback estimates assume Gulf Coast cooling costs of $150-300/month in summer and 8-12% cooling reduction. Actual payback depends on home size, insulation level, duct location, and local energy rates.
Should You Add a Radiant Barrier?
If you are planning a reroof within the next 1-2 years, the answer is almost certainly yes. At $300-600 added cost, foil-faced sheathing pays for itself within 1-3 cooling seasons on the Gulf Coast. There is no practical reason to skip it during a reroof. See Adding a Radiant Barrier During Reroof for the full case.
If your roof is staying in place, prioritize based on your home's weak points. A radiant barrier makes the most difference in homes that already have adequate insulation (R-30+) and sealed ductwork. If your insulation is below R-19 or your ducts are leaking, fix those first — the cost-per-comfort improvement is higher. Use the Hot Upstairs Cause Finder to identify your priorities.
If you have ductwork in the attic, a radiant barrier is more valuable. The 15-20°F reduction in duct surface temperature directly reduces the heat gain into your cooled air. In homes with well-insulated ducts inside conditioned space, the radiant barrier's benefit is limited to ceiling heat gain reduction alone — still measurable, but smaller.
For a full decision framework, see Should You Add a Radiant Barrier? The Decision Framework.
Think about it...
A homeowner has R-11 attic insulation (4 inches of fiberglass batts), leaking ductwork in the attic, and is considering a $1,200 radiant barrier installation as their first improvement. What would you recommend instead?
Frequently Asked Questions
What is a radiant barrier?
A radiant barrier is a reflective material — usually aluminum foil — installed in the attic to reduce radiant heat transfer from the hot roof deck to the attic floor and living space below. It works by reflecting infrared radiation, not by adding insulation thickness. FSEC research shows properly installed radiant barriers reduce cooling costs by 8-12% in hot climates.
Does a radiant barrier replace insulation?
No. A radiant barrier and insulation address different heat transfer mechanisms. Insulation slows conductive heat transfer (heat moving through solid material). A radiant barrier reduces radiant heat transfer (infrared energy radiating from the hot roof deck). You need both for maximum performance. A radiant barrier without adequate insulation underneath provides minimal comfort benefit.
How much does a radiant barrier cost?
A professional radiant barrier installation for a full attic runs $500-1,500 depending on attic size and access. During a reroof, foil-faced roof sheathing adds $0.15-0.30 per square foot — roughly $300-600 on a 2,000 sq ft roof. DIY draped foil installation costs $0.10-0.20 per square foot for materials.
Can I install a radiant barrier myself?
Yes, if your attic is accessible and you can work safely in the space. Draped foil (stapled to the underside of the rafters) is the most common DIY method. Work during cool mornings — attic temperatures during summer afternoons make the work dangerous. Leave a 3-6 inch gap between the barrier and the roof deck for convective airflow. Never lay foil directly on top of insulation — dust accumulation eliminates the reflective benefit within months.
How do I know if my radiant barrier is working?
Measure the temperature on the attic side of the radiant barrier and compare it to the temperature at the attic floor insulation. A working radiant barrier should show 15-30°F difference — the barrier side is hotter because it is reflecting heat back toward the roof, keeping the insulation side cooler. If both sides read similar temperatures, the barrier may be dust-covered, damaged, or improperly installed.
Do radiant barriers work in humid climates like the Gulf Coast?
Yes, and they may actually be more important here than in dry climates. Gulf Coast attics regularly exceed 140-160°F in summer. FSEC studies conducted specifically in Florida — with humidity levels similar to south Mississippi and Alabama — measured 8-12% cooling cost reductions. The key requirement: the reflective surface must face an air gap, and it must stay clean and dry to maintain reflectivity.
What to do next
Quick recap
Radiant barriers reduce cooling costs by 8-12% by reflecting infrared heat from the roof deck. Foil-faced sheathing during a reroof is the cheapest and most effective method. Retrofit installation works but costs more. Radiant barriers complement insulation — they do not replace it.
Your next step
If you're planning a reroof, ask your contractor about foil-faced sheathing. If your roof is staying, take the cause finder to see whether a radiant barrier is the highest-priority improvement for your home.
Keep reading